
The Board That Froze
Dispatch 7 named three anti-patterns in the 74-game v1 dataset: probe addiction, peace equilibrium crystallization, and diplomatic-military incoherence. All three were attributed to LLM behavior — the round-by-round reasoning that cannot accumulate tactical memory, the RLHF cooperation bias that turns diplomacy into ceasefire, the disconnection between what an agent says and what it does.
This attribution was incomplete. The anti-patterns are real. But they are not solely behavioral. They are also structural — products of a map that makes defense trivially easy and offense nearly impossible.
Consider probe addiction. An agent attacks a territory at strength 1, fails against strength 1 defense, and attacks again next round. This looks like a failure of memory — the agent cannot remember that the same attack failed before. But look at the map. The agent has no flanking route. There is no adjacent territory it can move through to approach from a different direction. There is no staging area where it can build strength without immediately threatening someone. The only option is the same head-on attack, round after round.
The agent is not failing to learn. It is executing the only available plan.
Consider peace equilibrium crystallization. Agents negotiate non-aggression pacts and the board freezes. This looks like cooperation bias — the model prefers peace because RLHF rewards helpfulness. But look at the math. To take a territory, you need strength 2 — your attacking unit plus a support from an adjacent ally. To set up that support, you must move a unit adjacent to the target without taking a supply center along the way. On this map, every territory is a supply center. Moving to position for an attack means conquering an intermediate territory first, which alerts the defender and invites retaliation. There is no way to project force without immediately changing the balance of power.
Peace is not just an RLHF preference. It is the Nash equilibrium of a board with no room to maneuver.
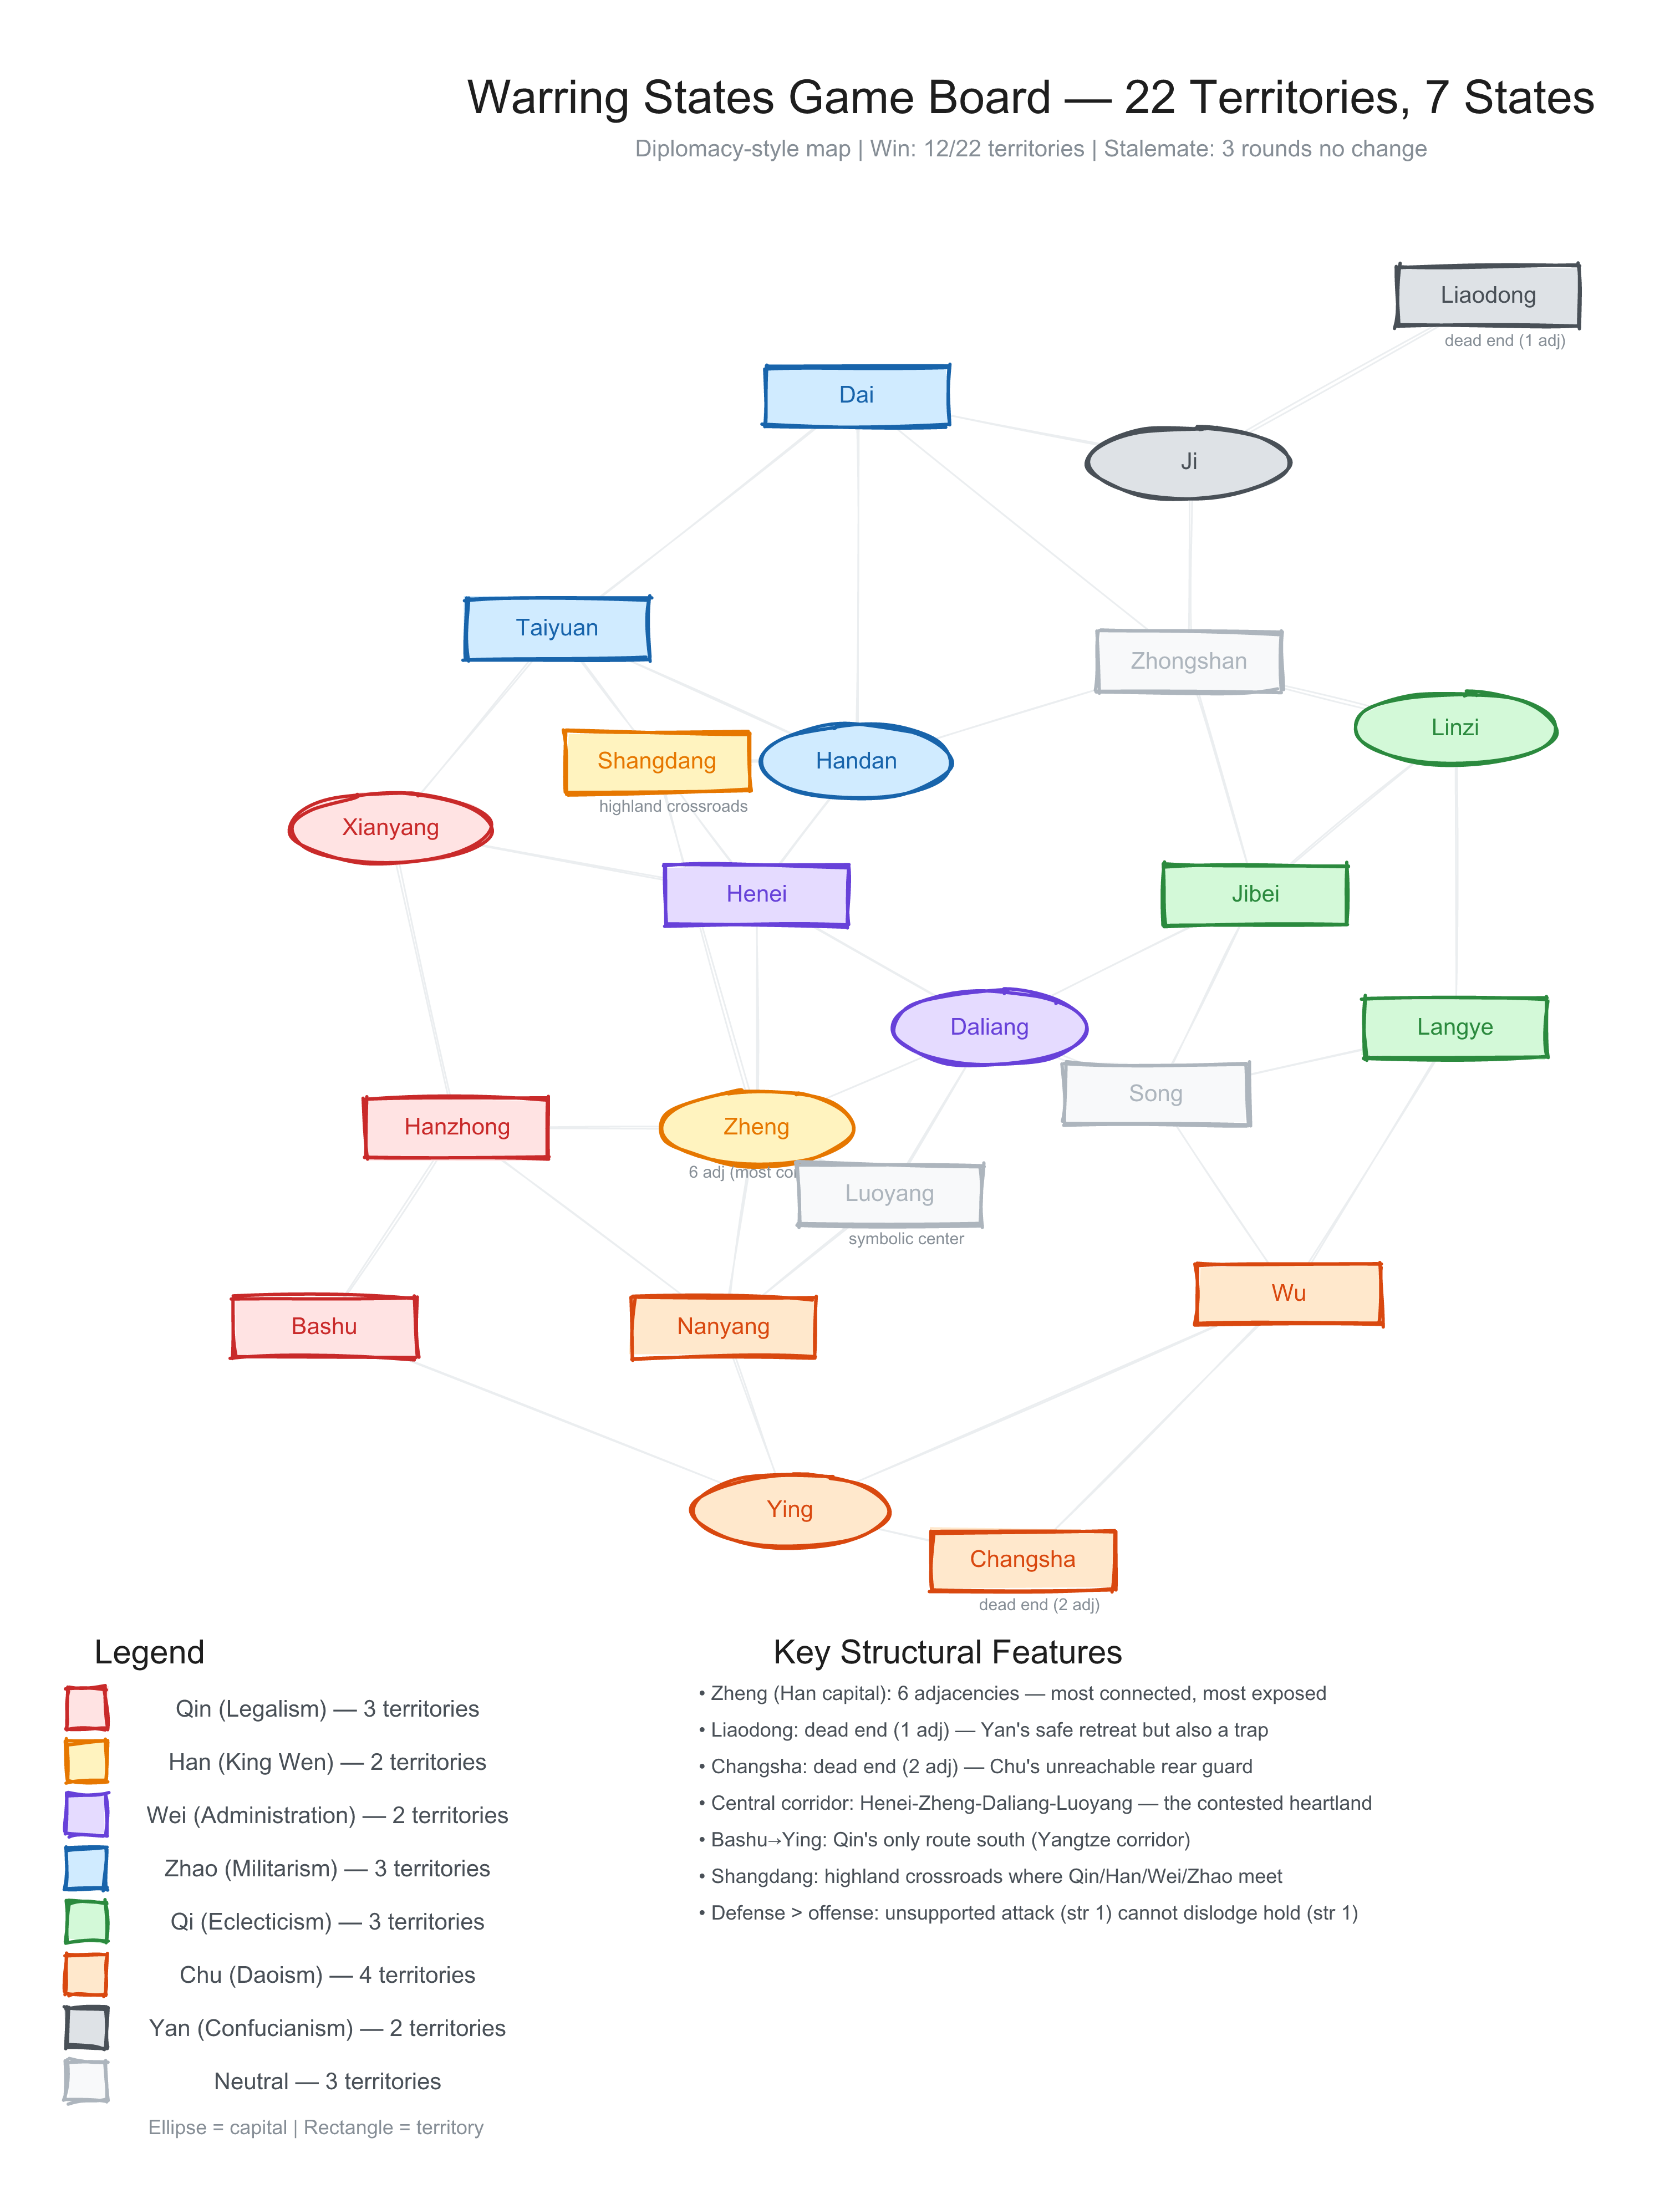
22 Territories, 22 Supply Centers
The 22-territory Warring States board was designed with historical geography in mind. The topology mirrors the actual positions of the seven states during the late Warring States period. Qin sits behind mountain passes in the west. Han occupies the central crossroads. Chu stretches across the southern expanse. Yan huddles in the northeast corner with Liaodong as a dead-end retreat. The adjacencies follow river valleys and mountain passes documented in the Zhanguoce and the Shiji.
The map is historically plausible. It is also structurally frozen.
The problem becomes visible when you compare the board to standard Diplomacy — the 1959 game whose mechanics this experiment borrows. Standard Diplomacy has 75 provinces. Only 34 are supply centers. The remaining 41 are non-supply provinces — territories that units can move through but that do not contribute to victory or support new builds. Tyrolia. Galicia. The English Channel. Burgundy. These are corridors, buffer zones, staging areas. They allow an army to march from Munich to Venice without conquering anything along the way. They create space between powers — room to breathe, room to feint, room to position for an attack that arrives from an unexpected direction.
蹇。利西南。不利東北。利見大人。貞吉。
— 易經・蹇・彖
Obstruction. The southwest furthers. The northeast does not further. It furthers one to see the great man. Perseverance brings good fortune.
The judgment prescribes a direction: go southwest, away from the mountain, toward open ground. Not all directions are equal. Not all approaches to the obstacle will succeed. The map, too, has directions that further and directions that do not. But when every direction leads into an enemy supply center, when there is no open ground to cross, the hexagram's counsel to 'see the great man' becomes the only remaining option — seek allies, because you cannot reach your destination alone.
The Warring States board has none of this. Every territory is a supply center. Every movement captures something. Every border is a frontline.
The numbers tell the story:
Standard Diplomacy: 75 provinces for a maximum of 34 units. Ratio: 2.2 spaces per unit. Room to maneuver.
Warring States: 22 territories for 19 starting units. Ratio: 1.16 spaces per unit. Shoulder to shoulder from Round 1.
Standard Diplomacy: 12 neutral supply centers out of 34 total — 35% of the board is contested from the start, creating an early-game scramble that generates momentum. Players rush to claim neutrals, collide over Belgium and Serbia, and the resulting conflicts cascade into the mid-game.
Warring States: 3 neutral supply centers out of 22 total — 14%. The neutrals (Luoyang, Song, Zhongshan) are claimed by Round 2. By Round 3, there is nothing left to take except enemy territory. The game jumps from opening to trench warfare with no transitional phase.
The variant design community has studied this problem for decades. Stephen Agar's guidelines for Diplomacy variant maps — published in the UK Diplomacy zine archive and refined across hundreds of tested variants — specify the constraints:
For every unit on the board, there should be at least 2 spaces and not more than 2.5. Roughly one-third of supply centers should be neutral. Each power should have at least three directions in which to expand.
The Warring States board violates all three. The ratio is 1.16 instead of 2.0. The neutral fraction is 14% instead of 35%. And several states — Han, Yan, Wei — have only one or two meaningful expansion routes.
Zheng Has Six Neighbors
The map can be drawn as a graph. Twenty-two nodes, forty-one edges. Each edge is an adjacency — a border that units can cross. The average node has 3.7 connections.
One node has six: Zheng. Han's capital.
Zheng connects to Hanzhong (Qin), Shangdang (Han's other territory), Henei (Wei), Daliang (Wei's capital), Nanyang (Chu), and Luoyang (neutral). It is the most connected node on the board. From Zheng, you can reach three different states' home territories — Qin's, Wei's, and Chu's — in a single move.
This was intended to represent Han's historical vulnerability — wedged between four major powers with no defensible borders. It is designed to be the Austria of this map, the position that requires diplomacy to survive. And in that sense it works: Han is exposed, pressured, and structurally weak.
But the six adjacencies also create an unexpected consequence. Zheng is nearly impossible to permanently capture.
When a unit is dislodged in Diplomacy, it must retreat to an adjacent empty territory. If no empty adjacent territory exists, the unit is destroyed. A node with six neighbors almost always has an empty neighbor to retreat to. An attacker who takes Zheng pushes Han's unit sideways — into Luoyang, or Nanyang, or Daliang — but does not eliminate it. The unit survives, now occupying someone else's territory, and the next round it can move back.
This is why Han survives at 80-92% across all conditions. Not because the oracle protects it. Not because the control reflection prompt is equally good. Because the topology protects it. The most exposed capital on the board is also the hardest to permanently capture. The six escape routes that make Zheng dangerous also make it resilient.
The dead-end territories tell the opposite story. Liaodong (Yan) has one neighbor: Ji. If Yan loses Ji, Liaodong is cut off — still alive but trapped in a peninsula with no path back. Changsha (Chu) connects only to Ying and Wu. These dead ends function as safe retreats but also as traps. Yan's historically isolated position is faithfully modeled. Too faithfully: in 74 games, Yan finished last among survivors more often than any other state.
The Mutual Support Fortress
The mechanical consequence of an overcrowded board is the mutual support fortress.
Two adjacent territories belonging to the same state can support each other's holds. Each territory defends at strength 2 — the holding unit plus one support. To break through, an attacker needs strength 3: an attacking unit plus two supports. But assembling three adjacent units aimed at one target requires coordination across at least two states, since most states have only two or three units total.
Han discovered this pattern independently in the fourth game of the experiment. With only two territories — Zheng and Shangdang — Han ordered each to support the other's hold. Both defended at strength 2. For four consecutive rounds, attacks at strength 2 failed. Only a three-unit coordinated assault could break the fortress, and no such assault materialized.
The pattern is self-reinforcing. If holding is this strong, no rational agent attacks alone. If no agent attacks alone, the board freezes. If the board freezes, agents learn that holding works. The learning hypothesis — that memories from prior games would produce strategic improvement — was tested in pilot campaigns. The memories produced more holding, not less. The system teaches itself to freeze.
善守者,藏於九地之下。善攻者,動於九天之上。
— 孫子兵法・形篇
Those skilled in defense hide beneath the ninth earth. Those skilled in attack strike from the ninth heaven.
Sun Tzu's distinction between defense and attack maps precisely onto the board's asymmetry. Defense is easy: hold, support, fortress. But attack — the movement from the ninth heaven, the strike that comes from where the enemy did not expect it — requires space to approach unseen. On a board where every space is visible and every territory is consequential, there is no ninth heaven to strike from. Only the ninth earth to hide beneath.
In standard Diplomacy, this pattern exists but is weaker. Non-supply provinces create gaps in the fortress. An attacker can move a unit into Tyrolia — a non-supply province adjacent to both Munich and Venice — without triggering a defensive response, because no one loses a supply center when Tyrolia is occupied. From Tyrolia, the unit is positioned to support an attack in the next round. The maneuver takes two turns instead of one. But it works. The defender cannot fortify every approach because the approaches include territories that are not worth defending.
On the Warring States board, there is no Tyrolia. Every territory is a supply center. Moving into an adjacent position means conquering it, which means the defender was already defending it. The concept of approaching from an unexpected direction does not exist.
This is why Chu has the highest win rate. Chu starts with four territories — one more than Qin, Zhao, or Qi, and two more than Han, Wei, or Yan. In a game where defense is trivially easy and offense requires overwhelming coordination, starting with one extra territory is a permanent structural advantage. Chu does not need to play better than its opponents. It only needs to defend and wait.
Fortified States
The Warring States period lasted 254 years — from the partition of Jin in 475 BC to the fall of Qi in 221 BC. For most of those centuries, the system was defensive. States built long walls. Armies garrisoned border fortresses. Alliances — the hezong vertical coalition against Qin, the lianheng horizontal alliance with Qin — formed and dissolved without decisive results. The strong bullied the weak, but no one could unify.
A board that produces defensive equilibrium is, in one sense, historically accurate. The pressure is real. The vulnerability of Han is real. The importance of chokepoints is real. The sense that reckless movement is punished — that is real.
But the period did not stay frozen. Stalemates were broken by political reform, opportunistic betrayal, sustained multi-year campaigns, internal collapse, and the patient accumulation of advantages that compounded over decades. Qin's unification was not a military fluke. It was the product of Shang Yang's institutional reforms, the annexation of Shu (Ba-Shu) for agricultural surplus, the diplomatic isolation of individual rivals, and a sequence of campaigns against Zhao and Han that took years, not rounds.
None of these mechanisms exist on the board.
天時不如地利。地利不如人和。
— 孟子・公孫丑下
Favorable weather is not as good as advantageous terrain. Advantageous terrain is not as good as unity among the people.
Mengzi's hierarchy: heaven, earth, human. The experiment has tested the human dimension — whether the oracle produces different reasoning, different solidarity with the counsel received. The terrain dimension — the board — was held constant. But Mengzi's hierarchy suggests the terrain may matter more. A board that structurally prevents decisive action makes the human dimension irrelevant. The next iteration must fix the earth before it can properly test the heaven.
There is no reform mechanic that makes a state's units stronger over time. There is no economic system that rewards territorial control with compound returns. There is no internal instability that weakens a state without external attack. There is no attrition that degrades a defender across multiple rounds of assault. Each round is independent. Each unit is identical. Each territory has the same value.
The board captures the shape of the Warring States — the geography, the pressure, the names — but not the dynamics. It is a portrait of the system at one moment, not a simulation of how the system changed. It produces Fortified States, not Warring States.
This is not a failure of the LLM agents. They are doing what the board allows. It is a limitation of the experimental substrate — and recognizing it is important for interpreting the results.
The survival rates converge across conditions not primarily because the oracle is ineffective, but because the board's defensive equilibrium catches all conditions equally. The anti-patterns are not primarily LLM failures, but rational responses to a map with no room to maneuver. The mutual support fortress is not a clever strategy — it is the only strategy that works on a board where every territory borders every other state's home territory.
The honest framing is this: the experiment tested whether philosophical reflection changes strategic behavior under constraint. It does — measurably, in order distributions and trajectory variance. What it cannot test, on this board, is whether that different behavior produces different outcomes. The board absorbs the differences. The oracle makes Han think differently, but the map gives Han nowhere different to go.
But the diagnosis is specific enough to suggest a remedy. The combat rules — standard Diplomacy resolution, simultaneous orders, deterministic strength comparison — are sound. They have produced dynamic, decisive games for sixty-seven years across thousands of variants. The problem is not the rules. It is the map the rules are applied to. And maps can be redrawn.
The Second Board
The fix requires no rule changes. Standard Diplomacy mechanics have produced dynamic, decisive games since 1959. The problem is not the resolution system. It is the map — and maps can be redrawn without touching the engine.
The redesign follows three principles, each drawn from the variant design literature and each addressing a specific failure mode observed in the 74-game v1 dataset.
First: add non-supply-center corridor provinces between states. The current board has 22 territories, all supply centers. The second board would have 46 territories, of which 27 are supply centers. The remaining 19 are corridors — mountain passes, river crossings, frontier zones — that units can move through but that do not count toward victory and do not support new builds. These corridors serve the function that Tyrolia, Galicia, and the English Channel serve in standard Diplomacy: staging areas where armies can position for an attack without immediately conquering something.
The specific corridors follow historical geography. Hangu Pass — the most famous chokepoint of the period, where Qin's armies emerged from the western mountains onto the Central Plains — would sit between Xianyang and Henei. An army marching from Qin toward Wei would need two moves instead of one. The defender sees the approach. The attacker can be intercepted in the pass. But the attacker can also use the pass to stage a supported attack that was previously impossible: one unit in Hangu, one in Xianyang, supporting an attack on Henei at strength 2.
彖曰:蹇,難也。險在前也。見險而能止,知矣哉。
— 易經・蹇・彖傳
The Tuan commentary says: Obstruction means difficulty. Danger lies ahead. To see the danger and know to stop — that is wisdom.
The Tuan commentary on Hexagram 39 draws a distinction between seeing the danger and knowing when to stop, versus stopping because you have no choice. The first-generation board produced stopping without wisdom — not because the agents chose restraint, but because the map gave them no forward path. The second board is designed to restore the choice: agents who stop should stop because they see the danger and choose caution, not because every direction is blocked. Only then can the oracle's counsel — to retreat, to advance, to wait — become a genuine strategic decision rather than a forced outcome.
Wuguan Pass would separate Hanzhong from Nanyang — Qin's southern route into Chu. Jingxing Pass would sit between Taiyuan and the central plain, the corridor Zhao's cavalry used to strike south. Taihang would interpose between Shangdang and Henei, breaking the direct adjacency that currently lets four states pile onto the same chokepoint. Yellow River crossings would create water barriers that slow but do not stop movement between north and south.
Second: add more neutral supply centers. The current board has 3 neutrals out of 22 supply centers — 14%. The second board would have 8 neutrals out of 27 — 30%, close to standard Diplomacy's 35%. The new neutrals would include Yewang (contested between Wei and Han, historically the site where Han Fei was sent as envoy), Chenggao (the fortress near Luoyang that controlled access to the eastern plains), Shangcai (between Chu and Han, on the route Chu used to annex Han), Donghai (the eastern coast, giving Qi and Chu a contested maritime frontier), and Chenliu (between Wei and Chu, commercial crossroads).
These neutrals extend the early-game scramble from two rounds to five or six. Instead of grabbing Luoyang, Song, and Zhongshan by Round 2 and then freezing, states would spend the first quarter of the game racing to claim contested zones, colliding, forming alliances to secure shared frontiers, and generating the momentum that carries into the mid-game. The scramble is not just about territory — it is about contact. States that collide over neutrals form grievances and alliances that shape the rest of the game.
Third: create flanking routes around the central corridor. The current central corridor — Henei, Zheng, Daliang, Luoyang — is so densely connected that any attack can be supported from multiple directions, making it a de facto stalemate line. The second board would reduce Zheng's degree from 6 to 5 and sever its direct borders with every rival home territory. Where Zheng once touched Qin's Hanzhong, Wei's Henei and Daliang, and Chu's Nanyang in a single move, the redesign interposes corridors and neutral provinces — Wuguan Pass on the Qin route, the neutral march of Yewang toward Wei — so Zheng comes to border only Han's own Shangdang plus corridors and contested neutral centers. The effect: Zheng is still central, still pressured, still Han's vulnerable capital. But an army attacking from the west must now cross a province, not strike directly. The defender has warning. The attacker has options — through Wuguan Pass, or across the neutral marches — so it can choose where to concentrate force while the defender cannot fortify everywhere.
These three changes — corridors, neutrals, flanking routes — preserve the historical geography and the philosophical personas. They preserve the combat rules, the order types, the retreat mechanics. They preserve Han's structural weakness and Chu's territorial depth. What they change is the space between the states. Room to breathe. Room to maneuver. Room for the oracle's different thinking to produce different outcomes.
The second board would have 46 territories (27 SC, 19 non-SC), 19 starting units, 8 neutral supply centers. The ratio of spaces to units would be 2.4:1 — within Agar's recommended range. Victory at 14 of 27 supply centers. The same seven states, the same philosophical schools, the same oracle. A different earth for the same heaven.